Pages
▼
Wednesday, August 31, 2011
Giddy up!
My little Addie Lou is getting so big! She can sit up for several seconds without support and is learning new tricks everyday, my favorite being-giving kisses. When I hold her in my arms I can't believe that I was ever this size! I love my little munchkin.
Monday, August 29, 2011
How to Build a Bookshelf Part 1
First we measure! Decide on...
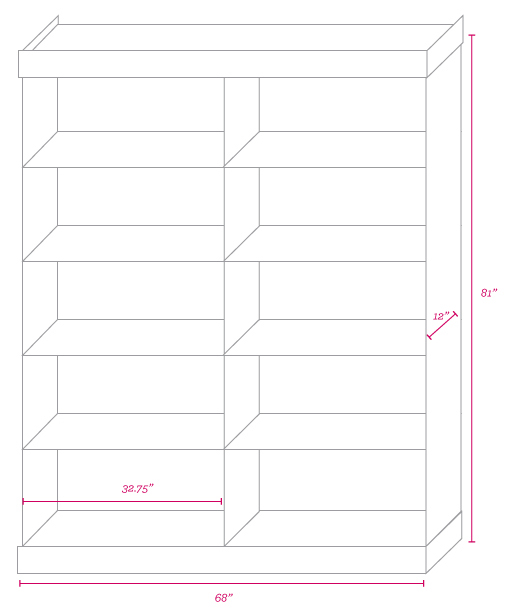
1. how big you want the overall bookcase to be
2. how many columns
3. how many shelves
4. and draw up your diagram.
Here are my measurements, mine is 5.5 feet by 6.75 feet, so it is pretty big, I would not go any longer than 30" between columns as your shelves will start to sag.
MATERIALS
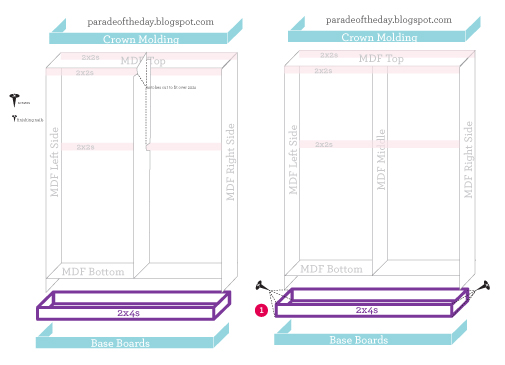
- 3 Vertical pieces of MDF cut to size (side, middle and side)
- 2 horizontal pieces of MDF cut to size (top and bottom)
- # of shelves (only purchase and cut these after you have put EVERYTHING together so that you get the perfect fit.)
- 2 large flat pieces of wood (it is the flexible wood that you will put on the back of the book case.
- Base Boards
- Crown Molding
- Miter Saw (we bought this little yellow box with a hand saw that lets you cut the molding at an angle)
- Metal Shelve holders? (the little metal things that go in the holes to hold the shelf up.
- 2x4s cut to size for the base (4 pieces)
- paint and varnish
- wood putty
- sandpaper
- drill
- screws
- finishing nails
You start with the base than go from there. Download my step by step instructions HERE.
Your bookshelf should look like this after part 1.
Please excuse the awful picture!
You can buy...
This week I will show you how to build your own custom bookcase! It is easier than you might think, the hard part is just making sure all your measurements are correct. To get started find the space in your home that you want to put your bookcase and decide how big you want it to be. Next we make a list of everything you need to buy.
Thursday, August 25, 2011
We eat oatmeal
almost every morning. It's part of our routine, wake up around 7:30 feed Lulabell a bottle then make us some oatmeal. This morning I decided to spruce it up with some mangos. Under the mangos is a heaping pile of brown sugar - don't judge, it still doesn't cancel out health factor of oatmeal. I love being home and having the time to cook up some old fashioned oatmeal, when I was working full time I only had time to do instant oatmeal at work--I can't believe I ate that stuff--but it was better than nothing. Go eat some oatmeal!
Tuesday, August 16, 2011
Baby A's Nursery
It took me a lot of blood, sweat and tears designing this nursery but when it was finished it was so worth it! My husband and I were painting the walls and putting together the dresser and crib when I was 38 weeks pregnant (don't worry, I wore a mask). Baby A was born a week later and the first thing I thought was, "She can't come yet her nursery isn't finished! But we finished it up a week after she was born. I love being in this room, it is so peaceful and everything was painstakingly (I have a really hard time making decisions) picked and designed by me. (My mom helped me out a little also.) You can Purchase the temple Print HERE.
Temple 8x11 Print
I designed this print for my baby girl's nursery and framed it in an 8x10 white frame. You can purchase this print HERE.


