And here is my sweet girl in her room.
Showing posts with label Home Design. Show all posts
Monday, November 14, 2011
Lulu's Nursery
I finally got some good photos of her nursery! I spent months scouring the internet and magazines trying to decide what do to for her room, if only I had pinterest a year ago!!
Tuesday, October 25, 2011
Office Time
It's that time of the year again, to paint now or wait till spring. I am voting for now so lets get this office going. I have been collecting ideas for my office for awhile now on my pinterest and I finally think I have the direction I want to take it in! Most of my office furniture is white, so my color scheme will be white furniture, grey walls, purple curtains and mercury glass accents. Below I found some great things from Urban Outfitters that is on my wishlist.
And this bottom set are some great offices with great organization and decor.
Friday, September 2, 2011
How to Build a Bookshelf Part 2
Next comes my favorite part. The wood putty, wood putty is like a band-aid...it makes everything better. Without the wood putty the molding in the corners did not match up at all. So here we go...
- Put wood putty on all corners of molding and holes where the finishing nails are. Let Dry.
- Sand wood putty down so that it matches the curves and looks like a corner.
- Measure out the distances you want your shelves to be (the heights) than measure how long each shelf should be in its SPECIFIC spot *This is where we ran into a problem we measured the width in only the middle of the column and used that as our length, then when we went to put them in realized our bookshelf got skinny towards the top (yes the poor girl is bottom heavy) so we had to saw down the edges which was a pain, just ask my husband.
- Go to home depot or your hardware store of choice (home depot will cut everything for you, lowes...not so much) and have your mdf shelves cut to your specifications.
- This is where i put beadboard wall paper on the sides to make it pretty, you could do that to the back OR a cute wallpaper would look pretty peaking behind your books. I suggest Graham and Brown wallpaper, Martha Stewart's is the same price but thinner!
- Paint everything. The back boards, the molding the shelves EVERYTHING.
- Drill holes where you want the shelves to be. I did 2 on each side.
- insert metal shelf holders.
- Insert shelves
- Fill up with books and pretty things!
Monday, August 29, 2011
How to Build a Bookshelf Part 1
First we measure! Decide on...
1. how big you want the overall bookcase to be
2. how many columns
3. how many shelves
4. and draw up your diagram.
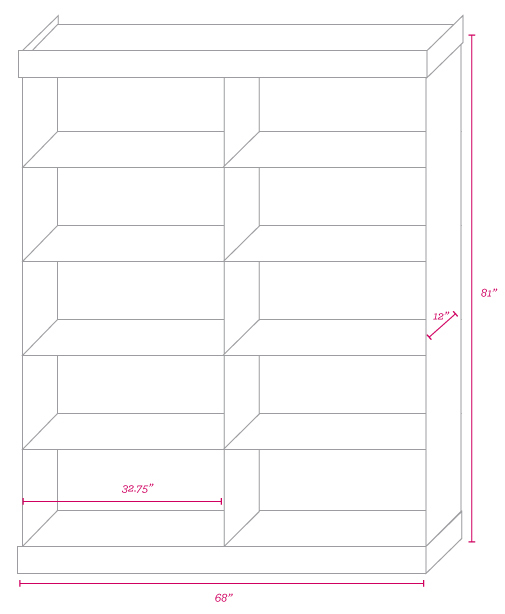
Here are my measurements, mine is 5.5 feet by 6.75 feet, so it is pretty big, I would not go any longer than 30" between columns as your shelves will start to sag.
MATERIALS
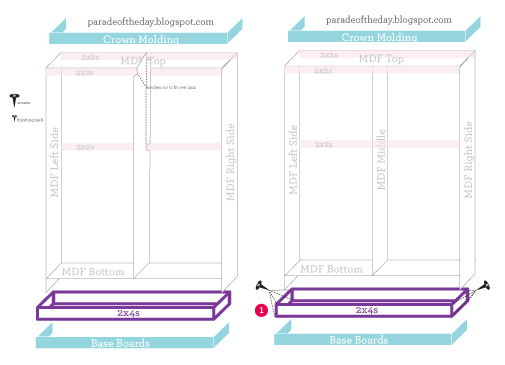
- 3 Vertical pieces of MDF cut to size (side, middle and side)
- 2 horizontal pieces of MDF cut to size (top and bottom)
- # of shelves (only purchase and cut these after you have put EVERYTHING together so that you get the perfect fit.)
- 2 large flat pieces of wood (it is the flexible wood that you will put on the back of the book case.
- Base Boards
- Crown Molding
- Miter Saw (we bought this little yellow box with a hand saw that lets you cut the molding at an angle)
- Metal Shelve holders? (the little metal things that go in the holes to hold the shelf up.
- 2x4s cut to size for the base (4 pieces)
- paint and varnish
- wood putty
- sandpaper
- drill
- screws
- finishing nails
You start with the base than go from there. Download my step by step instructions HERE.
Your bookshelf should look like this after part 1.
Please excuse the awful picture!
You can buy...
This week I will show you how to build your own custom bookcase! It is easier than you might think, the hard part is just making sure all your measurements are correct. To get started find the space in your home that you want to put your bookcase and decide how big you want it to be. Next we make a list of everything you need to buy.
Tuesday, August 16, 2011
Baby A's Nursery
It took me a lot of blood, sweat and tears designing this nursery but when it was finished it was so worth it! My husband and I were painting the walls and putting together the dresser and crib when I was 38 weeks pregnant (don't worry, I wore a mask). Baby A was born a week later and the first thing I thought was, "She can't come yet her nursery isn't finished! But we finished it up a week after she was born. I love being in this room, it is so peaceful and everything was painstakingly (I have a really hard time making decisions) picked and designed by me. (My mom helped me out a little also.) You can Purchase the temple Print HERE.
Subscribe to:
Posts (Atom)